How to Record CS2 Gameplay: Complete Guide for CS 2 Players

Geplaatst op in CS2

That 1v5 clutch felt incredible until you realized you weren't recording. Counter-Strike 2 players lose countless highlight-worthy moments because they don't have clipping software set up, and when they finally decide to install something, the options feel overwhelming. This guide breaks down every recording method that actually works for CS2, from Steam's new built-in system to traditional OBS setups, with the specific settings you need to capture clean footage without tanking your FPS. Whether you're reviewing demos to fix positioning mistakes or building a YouTube channel, you'll find the recording solution that fits your hardware and goals.
Steam Game Recording: The Built-In Solution
Valve introduced Game Recording as a built-in Steam feature in September 2024, and it's probably the easiest way to start clipping CS2 without installing anything extra. Steam Game Recording offers two modes: manual recording, which you start and stop with a hotkey, or automatic background recording, which saves your most recent two hours of gameplay.
The background recording mode works particularly well for CS2. When something clip-worthy happens, you hit the hotkey and Steam saves the last 30 seconds to two minutes (you configure this). No need to predict when you'll hit a nasty 3K or clutch a round. The footage already exists; you just tell Steam to keep it.
Setting up Steam Game Recording requires zero configuration beyond turning it on. Open your Steam settings, find the Game Recording section, and enable it. The default hotkeys work fine, but if they conflict with your CS2 binds, change them now before you forget mid-match. Steam handles everything else automatically, including audio from your mic and game sound.
One limitation: Steam Game Recording doesn't work with CS2 when trusted mode is active. You'll need to add -allow_third_party_software to your launch options, which disables trusted mode. This won't get you banned for using recording software in normal gameplay, but consistently disabling trusted mode can potentially impact your Trust Factor negatively over time. For most players recording personal highlights, the Trust Factor impact is negligible compared to what you'd get from toxic behavior or reports.

OBS Studio: Maximum Control for Serious Recording
OBS remains the standard for anyone who wants precise control over their recordings. OBS Studio is free and includes features like simultaneous streaming and recording, with an auto-configuration wizard that sets up basic settings based on your hardware. The learning curve exists, but once you've dialed in your settings, OBS produces consistently high-quality footage.
Getting OBS to Capture CS2
CS2 requires the launch parameter -allow_third_party_software for OBS to capture the game window. Without this, OBS will show a black screen when using Game Capture mode. Add it through Steam by right-clicking CS2 in your library, selecting Properties, and entering the command in Launch Options.
Launch OBS after starting CS2. In the Sources section, click the plus icon, select Game Capture, and choose "Capture specific window" mode. Select "[cs2.exe]: Counter-Strike 2" from the window dropdown. The game should appear in OBS's preview window. If the preview shows your game stretched incorrectly or at the wrong resolution, right-click the game capture source, select Transform, and adjust the size to match your monitor's native resolution.
Alternative: Display Capture mode works without the launch parameter, but it captures everything on your screen. If you alt-tab, your viewers or recording sees your desktop. Game Capture is cleaner when it works.
Optimal OBS Settings for CS2 Recording
Run OBS's Auto-configuration Wizard, selecting recording as your main purpose and GPU as your encoder. Apply those settings without changing anything, then restart OBS. This gives you a solid baseline.
For encoder selection, hardware encoding through your GPU produces the best performance. NVIDIA card users should select NVENC encoder and set quality to "Indistinguishable" in simple output mode. This handles 1080p60 recording without issues. AMD card users should choose the AMF encoder. If you lack hardware encoding options, the x264 CPU encoder works but impacts FPS more significantly during intense firefights.
For recording specifically, avoid CBR rate control. Use CQP (Constant Quantitative Parameter) with CQ level between 15 and 23, where lower numbers produce better quality. CQP adapts the bitrate based on scene complexity, keeping file sizes reasonable while maintaining quality during action-heavy moments like multi-player sprays through smoke.
Recording 1080p at 60 FPS captures smooth gameplay. If your system struggles, dropping to 720p or 30 FPS helps, but 60 FPS makes a noticeable difference for reviewing your movement and crosshair placement. CS2's fast pace benefits from higher framerates in recordings, even if you're not creating content for others.
One critical setting: In Windows graphics settings, add OBS Studio as a desktop application and set it to "high performance" mode. Also run OBS as administrator. These changes prevent Windows from throttling OBS during gameplay, which causes dropped frames in recordings.

NVIDIA ShadowPlay: Low-Impact Recording for GeForce Users
ShadowPlay (now called NVIDIA Share) offers the lowest performance impact of any recording method because it uses dedicated hardware on NVIDIA GPUs. ShadowPlay supports both manual recording and instant replay, where only the last set time period is saved when you hit the hotkey. The instant replay feature works identically to Steam's background recording but existed years earlier.
Enable the in-game overlay by pressing Alt+Z or toggling it in GeForce Experience settings under General. Press Alt+F9 to start or stop manual recording, or Alt+F10 to save the last configured duration with instant replay.
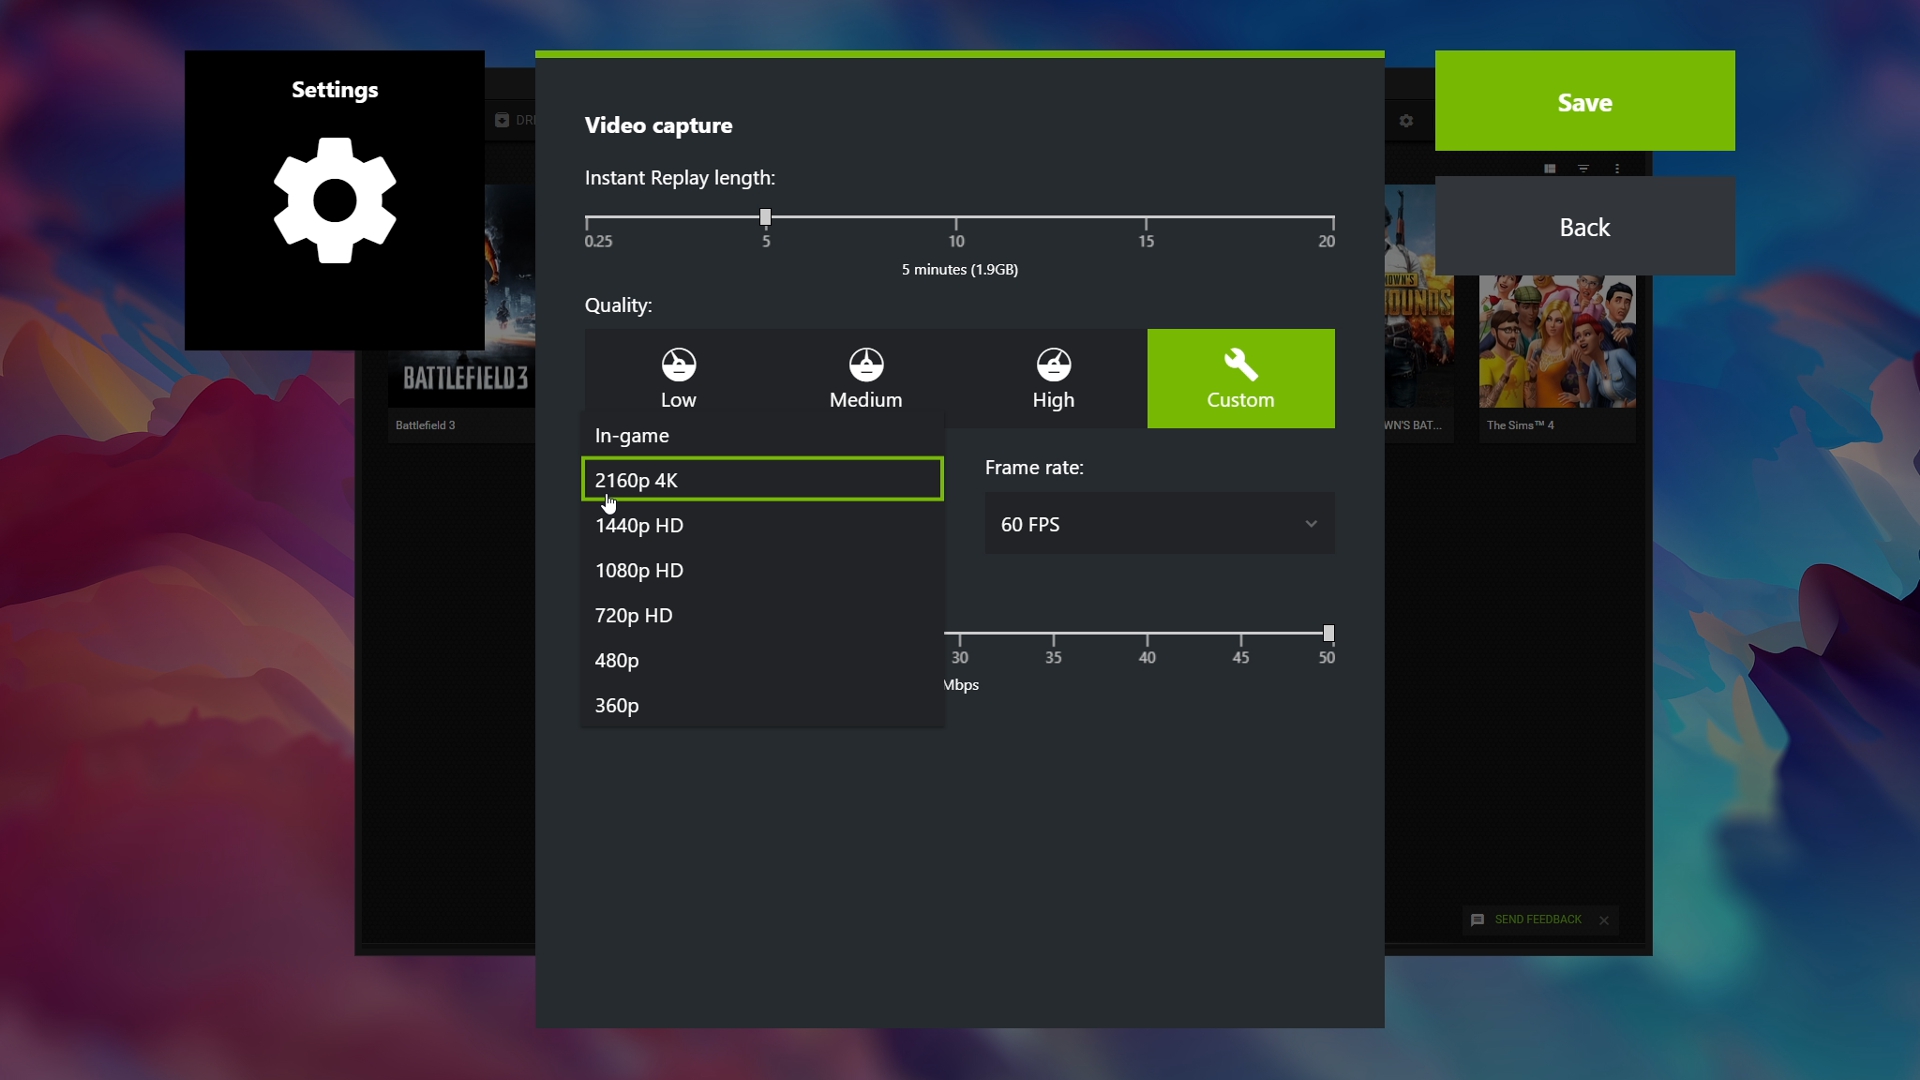
ShadowPlay Settings for Quality
Set your resolution to 4K in ShadowPlay settings even if your monitor is 1080p. This unlocks higher recording bitrates required for good quality, but ShadowPlay still records at your monitor's native resolution. Without this workaround, ShadowPlay caps bitrate at 85 Mbps regardless of what you select.
For maximum quality, set bitrate to 130 Mbps and choose 60 FPS. These settings produce large file sizes, but modern SSDs handle them without issues. If storage concerns you, 50 Mbps still looks clean for most scenarios.
ShadowPlay works with CS2 in trusted mode out of the box for some users, but others experience black screen recordings. Updating GPU drivers to the latest version and adding -allow_third_party_software to launch options typically resolves black screen issues. If problems persist after driver updates, the issue might be overlay conflicts with other software like Discord.
Some competitive players report noticeable input delay when recording or streaming with ShadowPlay in CS2, particularly affecting aim response during fast flicks. Testing this yourself matters more than general reports. Record for a few matches and see if your aim feels different. If it does, switching to instant replay mode instead of continuous recording can reduce the impact, or consider OBS with proper GPU encoding settings.
Medal and SteelSeries Moments: Automatic Highlight Capture
Medal provides built-in editor tools and an activity feed for sharing clips, making it popular for quick highlight capture. It works similarly to other clipping software but focuses heavily on the social sharing aspect.
SteelSeries Moments offers auto-clipping functionality that recognizes specific in-game events and automatically creates clips. For CS2, it detects 3-kill rounds, headshot kills, and knife kills. After your match ends, a window displays all generated clips, letting you quickly delete ones not worth keeping.
The automatic detection isn't perfect. Sometimes it misses plays or clips moments that aren't actually highlight-worthy. But for players who consistently forget to press the record button during matches, having any clip of a 4K is better than having none. You can adjust which events trigger auto-clips in the settings.
Both applications require the -allow_third_party_software launch parameter. Performance impact sits between Steam Game Recording and OBS, typically causing 5-10 FPS drops depending on your hardware.
Third-Party Software and Trust Factor: What You Need to Know
Every recording method except playing in windowed mode requires disabling CS2's trusted mode via launch parameters. When you activate the option to allow third-party software, CS2's Trusted Mode automatically disables. This security feature is designed to prevent cheating by restricting software interaction with the game.
You won't receive a ban for using approved recording software with this launch parameter. Recording software and visual filters like those from NVIDIA are generally considered safe and should not negatively affect your Trust Factor significantly. The Trust Factor system primarily targets suspicious patterns associated with cheating behavior, not legitimate tools.
That said, if you're paranoid about Trust Factor or play exclusively on official Valve matchmaking with concerns about your account standing, the workaround exists: run CS2 in borderless windowed mode. This lets you use display capture or window capture in OBS without modifying launch parameters. Switching to borderless window mode allows screen recording tools to capture gameplay without directly interacting with game files or settings. The tradeoff is borderless window mode can introduce slight input lag and reduces raw FPS compared to fullscreen.
Recording Settings for Different Hardware Tiers
Your hardware determines which recording method makes sense. High-end systems handle anything, but mid-range and budget builds need optimization.
High-End Systems (RTX 3070+/RX 6800+ with 8-core CPU or better): Use OBS with CQP 15-18 at 1080p60. You have headroom for maximum quality without worrying about performance. ShadowPlay at 130 Mbps also works flawlessly.
Mid-Range Systems (RTX 3060/RX 6600 with 6-core CPU): Steam Game Recording or ShadowPlay provides the best performance-to-quality ratio. If using OBS, stick to CQP 20-23 and ensure you're using GPU encoding, not x264. During benchmark testing on RTX 3060 systems, proper hardware acceleration maintained 120+ FPS in CS2 during recording, while improper settings caused drops to 90 FPS.
Budget Systems (GTX 1660/RX 580 or older): Steam Game Recording with background mode disabled or ShadowPlay instant replay minimizes performance impact. Recording only when necessary rather than continuously helps maintain playable framerates. Consider reducing CS2's in-game settings before reducing recording quality, as crisp footage of lower graphical settings beats blurry footage of maxed settings.
File Management and Storage Considerations
CS2 recordings at 1080p60 with decent quality settings generate 2-5 GB per hour of footage. A single competitive match produces 1.5-3 GB depending on your bitrate. If you're recording entire gaming sessions, storage fills quickly.
Save recordings to a separate drive from where CS2 is installed when possible. Recording to the same SSD as your game can cause stuttering in footage during intense moments. A standard 7200 RPM hard drive handles most recording bitrates fine, though SSDs eliminate any possibility of storage bottlenecks.
Regularly review and delete recordings you don't need. That missed spray through smoke on round 3 probably isn't worth keeping. Most recording software lets you set a maximum folder size or automatically delete old recordings, which prevents your drive from filling unexpectedly.
Getting Started: The Practical Approach
If you're just starting with recording CS2, begin with Steam Game Recording. Enable background recording for two hours, play a few matches, and see if the quality and performance work for you. Zero configuration required, and it's already installed with Steam.
When you want more control or plan to create content beyond personal clip collections, move to OBS. Run the auto-configuration wizard first, then tweak settings after you understand how your system handles recording. Don't immediately jump into manual encoder settings and custom configurations. The wizard produces good results for most hardware.
NVIDIA users should test ShadowPlay, particularly if you experience FPS drops with other methods. The hardware encoding efficiency matters more than theoretical quality differences for most use cases.
The recording method matters far less than actually having it running when you play. Pick something that works reliably on your system and stick with it. Your 1v4 retake won't wait for you to optimize encoder settings.
Geplaatst op in CS2